
Today I will cover how to assemble your MIO or Make It Own blank Pullip kit. If you haven’t heard already, Groove has finally answered the long held dreams and fantasies of customizers everywhere by releasing blank doll kits of Pullip, Taeyang, Dal and Isul. JPGroove very graciously sent me some samples so I could review them here on my blog.

Disclaimer: I have not yet customized my MIO Pullip kit, it is highly recommended that you customize your doll before you assemble it and rather than after the doll is fully assembled. The kit assembles and dissembles pretty easily so I chose to assemble mine so I could do this write up on how to assemble in a timely fashion. Eventually I will also be writing a how to customize MIO kit as well.
This is my first time really trying to write out a tutorial this in-depth so constructive criticism is welcome.
First, let’s check our supplies to make sure we have everything we need.

1. A blank MIO Pullip Kit – can be obtained from JPGroove or Pullipstyle.

This is what the kit looks like deboxed.

Close up picture of the disassembled eye mechanism. The eye mechanism is the most complex part of a Pullip so it has the most pieces
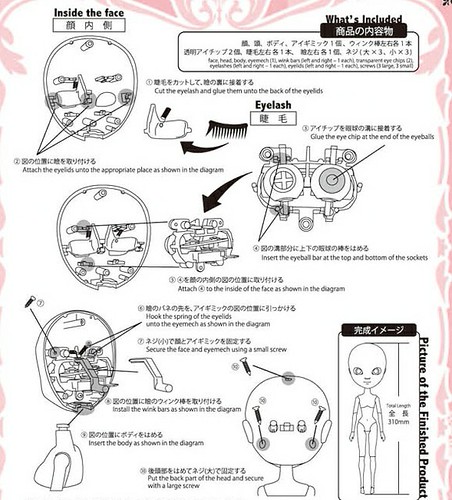
2. The instructions– These are the on the back of the box this may seem obvious but read through the instructions before attempting to assemble your MIO doll.

3 & 4. Glue & a small Phillips head screw driver– The glue is to glue the eyelashes and eye chips in, normal multi-purpose glue such as Elmer’s is fine for this DO NOT USE SUPERGLUE. Superglue will eat away at the plastic over time and causes yellowing. Some people prefer to simply tape the eyelashes on but tape degrades over time and can leave a bit of a mess. The small Phillips head screw driver is for the screws for the eye mechanism and the body.
Okay, now that we’ve checked our supplies let’s begin! Don’t forget to wash your hands before you start.
Step 1
 Cut the eyelashes to fit and then glue them unto the eyelids. They should hopefully look something like the ones I have pictured above when you are done.
PRO-TIP– If you don’t like the eyelashes Groove provides in the kits you can use any normal human false eyelashes they just need to be trimmed to fit the eyelid (you can find some really unique lashes around Halloween). If you wish to paint the eyelids, it is recommended that you do so before attaching the eyelashes.
Step 2
 Insert the eyelids into the faceplate as shown.
Step 3

Glue the eyechips into the eye mechanism. Make sure the bar that comes out of the top and bottom of the eyeballs are lined up in the sockets like they are in the picture above- this will be important for the next step.
PRO-TIP I just used the clear chips provided in the kit, the clear chips are cool because paint them any color you want. If you don’t like the clear ones provided though you can order a pair of eyechips through Coolcat or other suppliers. If you want something really unique though you can buy custom hand-painted eyechips from various sources on etsy, I personally recommend KiraKiraMeansSparkle.
Step 4

Insert the eye mechanism into the faceplate and then hook the springs unto the eye mechanism as shown in the picture above.
Step 5

Now it’s time to screw! There are three screws that need to be screwed in two on top and one on the bottom.
Step 6

Insert wink bars as shown.
Step 7

Insert body into neck hole of faceplate like pictured above.
Step 8

Put back of head on, use your screw driver to screw in the screws.
Step 9

Voila, she is assembled! Sit back and admire your handiwork. Don’t forget to make sure your Pullip can close her eyes without any problems, if the eye mech wasn’t assembled correctly she won’t be able to T_T. If she can’t close her eyes, look over the instructions again then take her back apart, figure out what went wrong and reassemble her.

Additional Information
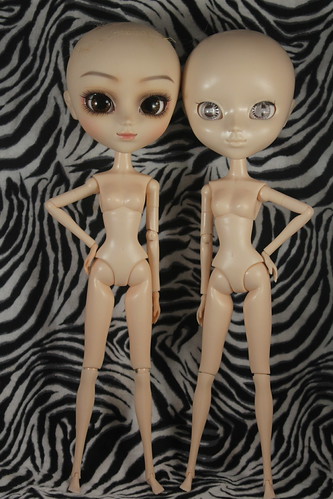
Versus a normal standard release Pullip (Princess Rosalind). Note how the standard release still retains some residue from her wig. There is also a slight color difference.

Versus a normal standard release Pullip (Princess Rosalind) and a replacement MIO Pullip body.

Obitsu skintone comparison- Fleshtone is definitely too dark to match. White isn’t a perfect color match but it would probably be acceptable.
Please note I do not have coconut or maronne obitsus but they are darker than fleshtone which is too dark too match anyway.
Again, this is my first time writing a tutorial like this so please don’t hesitate to ask if you have any questions/something wasn’t clear. I appreciate constructive criticism as I am always looking for ways to improve my site.
A big thank you to JPGroove for making this tutorial possible!


lieben dank es ist sehr hilfreich ❤
habe sie mir auch bestellt und bin schon neugierig 🙂
was kann ich für die klaren Chips an farben benutzen also Nagellack.??
lieben Gruß Marion
Vielen Dank, habe ich Acrylfarbe für die Augen
My German’s rough it’s been a few years ^^; I used acrylic paint for the eye chips.
do you know onf any retailer that sells the mio kit and has a wide variety of wigs?? (i know of pullipstyle but i dont really like the retailers wigs) im from colombia so the shipping costs pretty much half of the product or more , so im in search of a retailer that sells all what i need so that i only make one order for each custom.
sorry for the trouble and thanks for your attention 😉
The MIO wigs are higher quality than the wigs we actually get on the dolls. I believe plasticpop.de had a limited selection of other wigs and mio body kits in stock but everything was more expensive so it would unfortunately make more sense and cheaper to order a body kit from PS and a wig from some other retailer if you don’t want a Groove wig.
Do you have any tips on how to paint the clear eye chips? Like, what size brush to use and whether to paint the iris or the pupil first?
I don’t think I ever actually ended up painting any of mine but I would use a small brush to paint them and probably do the pupil first.
Wich bodytype is this MIO?
I would like to know this as well, because many of the Pullip doll sewing patterns specify which body type is being used.
Type 4 all Pullips released after 2009 including the MIO kits have the type 4 body
I was wondering why the MIO body is so shiny?
The head is shiny because it hasn’t had any type of sealant applied to it, once you give her a face up you seal it with MSC spray (or Volks spray etc) and it becomes matte. I believe I talked it about it a bit in the customizing the MIO kit post https://pullipsandjunk.com/2013/11/13/how-to-customize-pullip-the-guide-for-the-not-that-particularly-artistically-skilledinclined-part-1/
What skin colour is this MIO? I am going to buy one next month and put an obitsu on it and want to make sure the colours are very similar. Have you any tips on the obitsu skin tones that would go with each of the MIO kits?
It’s the first kit released so Normal MIO. Check out this post it’s got a photo comparison of dolls that are said to be the same skintone as the MIO kits, there is a comparison with them and white skin obitsu as well https://pullipsandjunk.com/2014/04/29/pullip-mio-kits-updated-information-photo-comparison/ in the comments there is a link to a comparison between the tan and normal obitsu.
How large are the screws? I bought a Dal kit but I managed to lose the screws 😦 So, I need to go buy new ones
I’m unsure of the actual measurement as I’ve always bought them via Coolcat http://us.sk-coolcat.com/front/bin/ptdetail.phtml?Part=p_02&Category=258349
Thank you!