Please note that this tutorial was authored by Requiemart and was originally posted on her website, it is being archived here with her permission/blessing as a part of the Pullip Information Preservation Project.
A general note about face design:
All pullips have the same face. You may carve out the eye a bit, or open the mouth, but it’s still the same face. Because of this, it is mostly left to makeup to create the personality. You’ve probably already seen lots of customs, but have you studied them? Look at different custom pullips, look at different blythes, and BJDs. Pay attention to how surface differences can appear to change the shape and character of the entire face.
The best thing you can do to prepare for this is to go to a bookstore or library and browse through professional makeup books. They will give you great examples of how a simple thing like lip shape or eyebrow shape can influence the entire face; that’s what the majority of those books are about. Replace ‘eyeshadow’ and ‘blush’ with pastels, and lipsticks and liquid eyeliners with paints; just about everything is transferable. You don’t have to worry about covering up flaws on a dolls face, or creating better symmetry; just think of your doll as a model with perfect skin, who sits ever so still for you. I’m not writing a book, so I’ll only cover it lightly in each category.
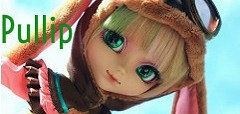
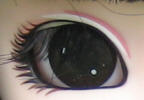
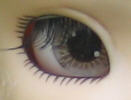
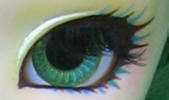
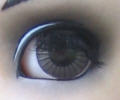
Eyes are the windows to the soul, and nothing will make your doll come alive more than the eyes. These are also the trickiest part. All of the eyes above are the same shape, and yet with paint they do not look the same shape. Each shape also suggests a bit of personality to you, doesn’t it?
You can carve the eyes. But you rarely need to. There are two parts to the shape of an eye, they eyeliner, and the painted lashes. The eyeliner is the solid line around the eye in she shape you want. After that, eye eyelashes are incidental. They will pretty up the eye, but will not affect the shape as much as the eyeliner. You can’t do the eyeliner in anything but paint. The lashes can be done with paint or pencil; if you do the eyelashes in pencil, you should do them first and apply any eyeliner over that. If you paint the lashes, do eyeliner first.
If you mess up a lot, do the eyeshadow after you set up the eye, as it is very difficult to erase lashes without taking eyeshadow with it.
A note about pastels: If you prime your surface well with sandpaper, you shouldn’t need to coat it with a base prep/sealant such as testors dullcote or MrSuperClear. You can, and it will make the pastels stick better (use layers for dark colors) but a base coat is not necessary. A topcoat almost always is, but as sealants often screw up the makeup they are supposed to protect (droplets, misting, discoloration) I try to use as little of them as possible. MrSuperClear was formulated for resin, not pullip plastic.
Eyeshadow (and blush) are applied with a soft round tipped brush (think miniature makeup brush) or a Q Tip if necessary. Shave a little bit of the pastel onto a piece of paper with a razor or a scissor. Take your Q tip or brush and dip the tip lightly into the powder. When doing an eye, apply first in the area you want darkest (still lightly!) and softly spread the powder outward in wider and wider arcs. When doing a cheek, you will apply a loose ‘O’ shape where you want the blush to be and do light overlapping circles around the general area to spread the blush evenly.
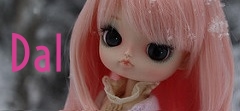
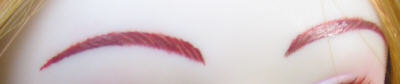


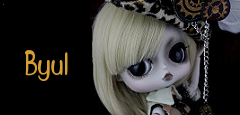
While eyes are what makes the doll come alive, the eyebrows are the most expressive feature, and will shape your doll’s personality the most. Thicker eyebrows give a more natural look, thinner eyebrows are more dainty and made-up. After that, the shape should explain itself. Which eyebrows are naughty? Which ones seem sad? Which ones are the most friendly? For each of these questions, at least 90% of you will have the same answer.
A good technique for sketching eyebrows is first to do reference points with a colored pencil in a lighter color than you are going to do the brow. Draw a point above the inside of each eye where you want the brow to start. Draw a point above the outside of each eye where you want the brow to end. Draw a point where you want the brow to be at it’s highest. Once you have these points symmetrical , draw a light line connecting each lines to make a ‘ghost eyebrow’. If it still looks symmetrical, either start painting or filling out the shape with pencil strokes. If you’re still having trouble getting symmetry, use tracing paper over the eyebrow you like best and trace the eyebrow. Use a razor blade to cut out the shape, and position the stencil you’ve just made over the other side of the face and either fill in, or mark it in such a way so that you can finish it off after you remove the stencil.
Pencils tend to do better with the natural look and paint with the made-up look. For a softer natural look, fill out the shape of the brows with pastel, and use pencil or fine paint strokes on top.

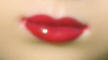
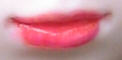
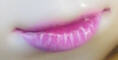
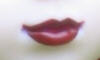
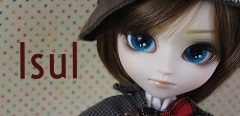
Pullips have a natural lip shape, just like you and me. If you’ve read your makeup books like I suggested, you know that that is really more like a guideline. Lips don’t influence personality as much as the eyebrows, but you want to make sure they don’t clash. For example, would you give a friendly looking girl with round eyes and natural eyebrows the lips on the right? Probably not. It would make the face look disjointed.
A solid paint color works like lipstick. If you want to make the lips appear fuller, don’t extend them out in each side as much, use a lighter color, and blend in a slightly lighter shade on the inside of the bottom lip. If you want to make the lips look more natural you can use pastels to tint the area and cover that with gloss varnish. (tip: if you have trouble getting the lips symmetrical with a Q tip or brush, just cover the area with a solid blush of pastel. Paint the shape of the lip with the varnish.
After it dries, use Mr Clean magic eraser to get rid of the unwanted pastel outside of the varnished area). Experiment with effects by layering darker and lighter shades in different areas and painting highlights. Even if you are using a super pigmented paint, do not paint over the lips more than 2 or 3 times maximum before you sand all the paint off and start over to keep from making the lips chunky and keeping the paint from scratching off easily (the more layers, the poorer the adhesion).