
Recently I’ve been talking a lot about how the Make It Own blank Pullip kits are absolutely amazing because the possibilities of what could be done with them are basically endless….in the skilled customizer’s hands anyway. But what if you aren’t that particularly skilled or inclined? You could commission someone else to do it that’s normally what I do but virtually every customizer I know of”s wait list just filled up for the next several months the second these kits were announced. Of course you could always try to do it yourself…
When I found out the MIO kit was coming from Groove, I asked Requiemart to teach me how to customize it. What are Requiemart’s qualifications? She made this darling little killer below for one and when I said made it that means she not only customized the doll, she also custom-made and styled her wig and her outfit from scratch (the only thing she did not make was her hat and shoes).

oh and this one too because Groove has done Alice to death (haha!) the only original way left to go would be a Zombie Alice.

And those are just two of the custom dolls that she made that I now own, she’s made many, many others.
I love custom dolls but virtually all of mine were commissioned or bought already customized because I made an honest assessment of my customizing skills a long time ago and realized that I was much better at coming up with ideas for customs than actually customizing. For anyone morbidly curious this is my first ever custom here also my extremely early photography so it isn’t pretty by any stretch of the imagination, she has since been recustomized by Requiemart into the lovely Nyx. The goal of this experiment was not to make jaw-dropping amazing custom dolls like hers as that takes years of experience and a level of skill I’ll never be able to achieve but for me an unskilled person to make a reasonably simple but pretty custom. If I can make a custom, anyone can make a custom!
I went to Requiemart’s house this past Monday for my mini customizing workshop. After we handled new business and new dolls were mutually shown off etc, we quit horsing around and got around to my learning how to customize.
 Isul Yomi and his fabulous horse
My homework before the class had been to read through her wonderful guide to customization on her website here . I also had to come up with an idea for the doll that I liked but that I was capable of doing on my own. My main challenges was due to a car crash several years ago I suffered severe nerve damage to my predominant arm/hand so I don’t have a lot of fine control in the hand I use so we had decided that my doll would be mostly done with pastels as painting was pretty much out.
Before starting it is very important that you already have a pretty good idea of what you want the custom to look like I wanted a simple but pretty doll. Also before starting customizing wash your hands! It’s also important to check your supplies.
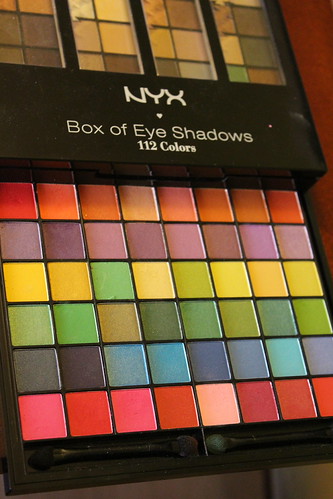
Wait is that EYE SHADOW? I was a bit skeptical at first but I was assured by Requiemart that it would be fine, so long as I did not use any type of liquid eye shadow or anything with oil in it (as that could eat away at the doll). Regular eye shadow is essentially just pigment ie. the same stuff pastels are made of that has the added benefit of being quite cheap, the 122 color eye shadow palette that she provided me with for this cost all of $20.
Other supplies included make up brushes, gloss sealant, Mr.Super Clear, a magic eraser and a kneaded eraser to make all the mistakes I was sure to make go bye-bye!

Step One: Prep your head! Sanding the doll’s face or spraying it with sealant gives the paint/pastel something to stick to since we had an absolutely blank face to work with we opted to spray her with Mr.SuperClear.
Step Two: Eyebrows! Normally the eye make up would be the first step but this particular step was going to present the greatest challenge to me as like me doing two symmetrical eyebrows haha you’re kidding right? I remember asking when we were first discussing this project if my custom could be like Bouquet or Arashi and just not have eyebrows but I was told not to worry. This isn’t the normal way Requiemart does things but she said for every problem there was a way to work around it. I was told to pick out a set of eyebrows that I liked from anywhere and I decided that I would like to base her eyebrows off of Majuellae’s. Majuellae was a boxing kangaroo themed Pullip release announced for release in 2006 that was later canceled and replaced with Nahh-ato.
 Admit it you thought I was kidding, right?

Pullip eyebrows are normally roughly slightly longer than an inch, I was told to already have my photo sized accordingly.
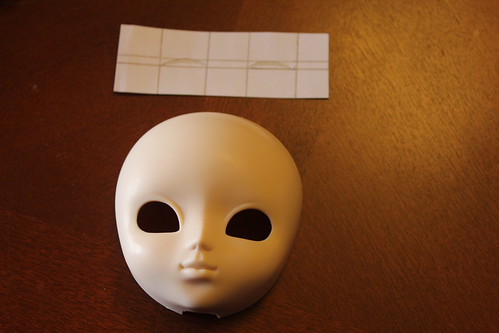
Have you heard of something called eyebrow stencils? I hadn’t. There is a good video on youtube here explaining how to make them. We made an eyebrow stencil based on Majuellae and carefully cut out the eyebrow shape with a razor. Also made a grid to make sure everything lined up properly.
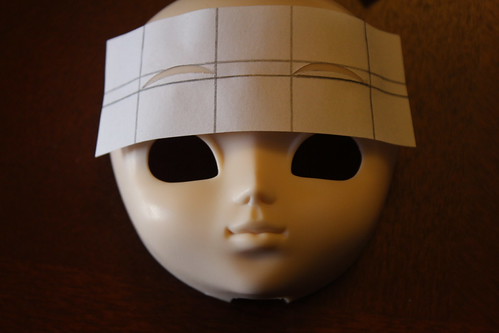
Line them up, do you want high or low eyebrows? I went with like normal eyebrow height.
 Select your “pastel” color

Just filling in the eyebrows..

I went over them a second time with a slightly darker color to give them a little depth.

Voila, two pretty much symmetrical eyebrows! Did I really just do that? We then sealed the eyebrows so I couldn’t mess them up while I was working on the other parts of her face up.
Step 3 Eye Make Up. Part of the peril of making a how to guide when it is your first time even attempting to do something like this in several years that you were never particularly that good at means there is a good chance you’ll end up chronicling your mistakes along the way too. I ended up redoing the eye make up completely three times as I was being kind of indecisive about the color, first try was black which was deemed too dark, second time we decided to go with a more earthy brown and I thought that was going to be the one and customized the rest of the doll put her back together then decided that I absolutely hated the brown and that I had gone way too overboard with it so I ended up taking the doll back apart and wiping the eye make up. The eye make up was redone a third and final time in a much more subtle shimmery pink, the pictures for this step and the subsequent ones will still mostly show the brown though. Ugh.
This is normally the step where you would be painting eyelashes then doing eye shadow, I’m not doing painted eyelashes as that is beyond my skill level for now.
 First line the rim around the inside of the eye with your chosen color.

It’s just like how you would normally do human eye shadow, start on the outside and work your way towards the center of the face in a gentle swooping motion. Repeat on other eye.
Stay tuned tomorrow for the second part of How to Customize Pullip: The Guide for the not that Particularly Artistically Skilled/Inclined Part 2 and the reveal of Miyo (yes, the custom has a name!). Also coming in the near future, How to Customize Dal: the actually talented artists edition!


Thank you so much for sharing this tutorial! Looking forward to both the second part of this and also the Dal tutorial.
Thanks the second and final part of this post should be up later tonight, I’m honestly not quite sure when the Dal tutorial will be up but hopefully soon (maybe over the weekend?).
Yay!! Sooo wanting to see the part.2!! That’s just…!! PERFECT!!
Thanks for the guide! And all the news.. And, well, I just love everything here, so, let’s stop before I go all lovey-dovey XD
❤
Thanks so much ❤ I'm working hard to get part 2 up later tonight.
Thanks for reading 😀
is the pullips head from the kit the same material as the official pullips? ive been wondering this since the photos of your pullip kit doll has a gloss to it.
Yes it’s the same material the only difference is the heads in the mio kits haven’t been sealed so they come shiny once they have been sealed/customized they are not shiny anymore.
and thank you for your time, I love your posts they are really helpful for me!
Thanks ❤
Do you know where to get one of those sets of eye shadow by any chance?
When I got home that night, I ordered a eye shadow palette similar to this one with 120 colors in it from Amazon for like $14 or $15 I tried to find a palette like this one at like Walmart but didn’t have any luck. They should normally run around $20 or a little less unless you want to get really fancy.
Thank you for your answer dear.
I have a few questions:
1. With what kind of stuff did you seal the eyebrows?
2. Are there any markers you could use for the ‘eyeliner’ without damaging the doll?
3. Do you have to glue the wig on or could you put it on with double sided tape?
4. How can you make the face of a pullip matte?
I’d be so happy if you would answer these questions!
Thank you 🙂
1.You would use mr super clear
2.Don’t use makers use water colour pencils
3.I advise double sided tape
4.with mr super clear matte
(Where a mask as it toxic)